HTML 基础
web 前端开发基础
- HTML
- css
- js
- jquery
- bootstrap
我们从前学的网络编程,都是基于C/S 架构的。即,我们写客户端的同时,还要写一个服务端。通过客户端和服务端的交互,实现各种功能。
从今天开始,我们要学习前端开发。前端是基于 B/S 架构的。我们开发的东西以网页的形式呈现。浏览器作为客户端,我们只需要写好服务器的逻辑就可以了。
从本质上讲,浏览器也是基于 socket 开发的。于是,我们就可以写一个服务端,来接收网页访问的数据:
from socket import socket
skt = socket()
addr = ('127.0.0.1', 8001) # 监听本地 8001 端口
skt.bind(addr)
skt.listen(5)
while True:
conn, client_addr = skt.accept()
acq = conn.recv(1024).decode()
print(acq)
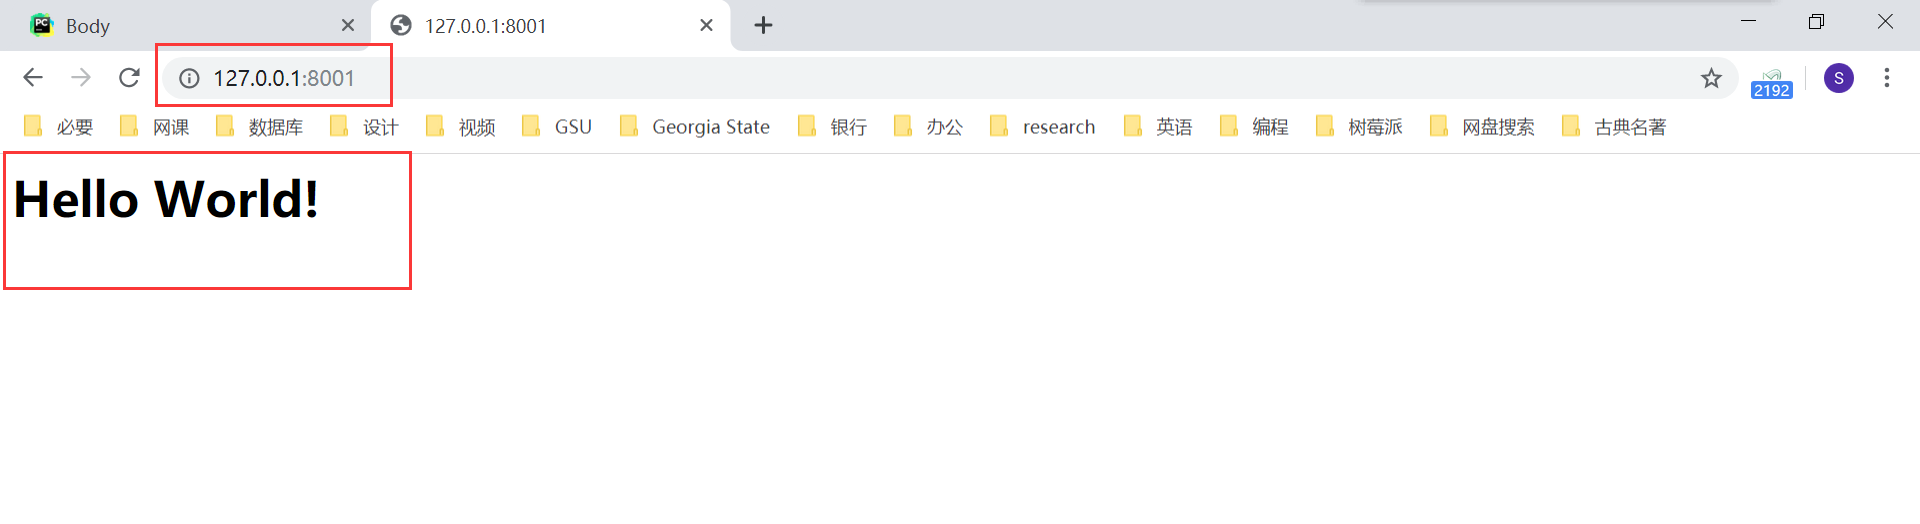
conn.send(b'HTTP/1.1 200 ok\r\n\r\n') # http 协议的回应格式,表示连接成功
conn.send(b'<h1>Hello World!</h1>') # 一段浏览器能读懂的语句
conn.close()将程序运行起来后,在浏览器中输入地址 127.0.0.1:8001,就可以看到浏览器中看到输出的内容了。
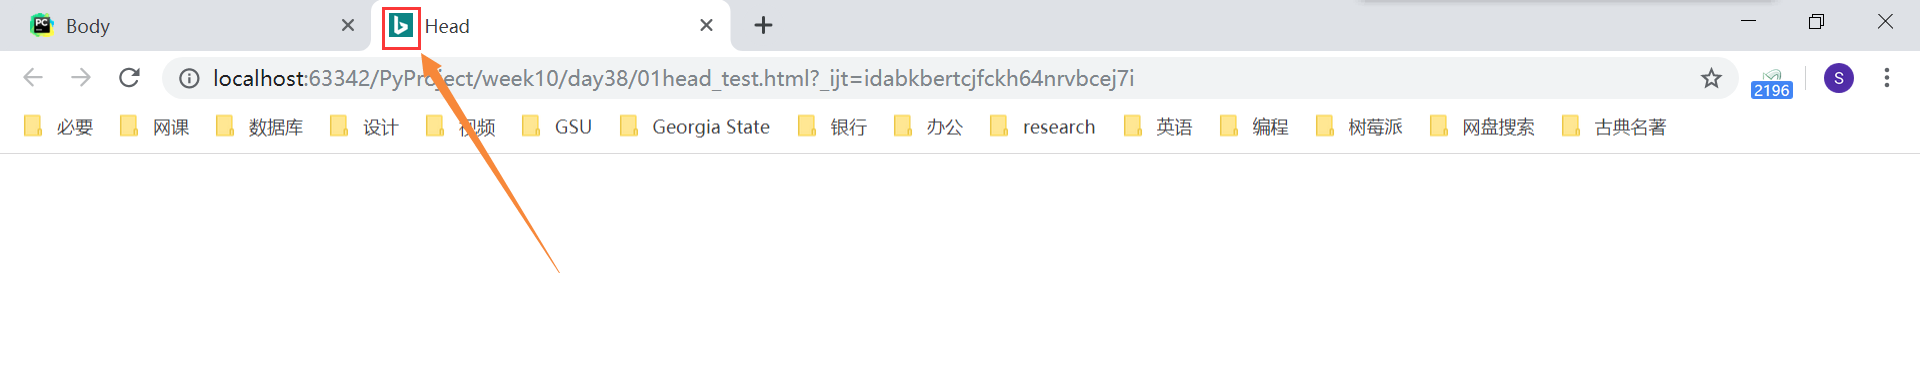
不过我们自己写的 socket 服务端太过简单,以后我们都是在 PyCharm 中打开网页。PyCharm 会自动帮我们配置 socket 服务端。在将来,我们还会通过 web 框架作为服务器。

文档结构
HTML 语言是一种超文本标记语言(hypertext mark-up language),通过使用一个个标签,实现标记的效果。
其基本的文档结构如下:
<!DOCTYPE html>  <!-- 文档声明 -->
<html lang="en">  <!-- 语言 -->
<head>  <!-- 网站配置信息 -->
    <meta charset="UTF-8">  <!-- 解码方式 -->
    <title>皇家赌场</title>  <!-- 网站标题 -->
</head>
<body>   <!-- 网站显示内容 -->
    <h1>
        <!-- 26期 皇家赌场 -->
    </h1>
</body>
</html>
其每个部分的含义为:
- 最开头的
<!DOCTYPE html>用来声明文档类型为 HTML - 整个文档部分被包含在一对
<html>标签中 - 文档分为 head 和 body 两个部分
- head 标签用来声明文档中的各种属性(比如解码方式,网站标题等,下面会详谈),不会显示在网页中
- body 标签是网页中真正显示的内容,我们的大部分操作也都是在这里进行
标签写法分类
全封闭标签  <h1 xx='ss'>xxx</h1>
标签属性   <h1 xx='ss'>xxx</h1>    xx:属性名  ss:属性值
自封闭标签  <meta charset="UTF-8">
head 标签
meta 文档字符编码
<!DOCTYPE html>
<html lang="en">
    <head>
        <meta charset="UTF-8">
        <title>我的网页</title>
    </head>
    <body>
        <h1>叫爸爸</h1>
    </body>
</html>
meta 页面刷新
<!DOCTYPE html>
<html lang="en">
    <head>
        <meta charset="UTF-8">
        <title>世上最牛逼的页面标题</title>
        <meta http-equiv="Refresh" content="2" />    <!--每 2 秒钟刷新依此页面-->
    </head>
    <body>
        <h1>这是个栗子,快尼玛给我运行起来。</h1>
    </body>
</html>
meta 关键字
meta 标签可以设置关键字,用于搜索引擎收录和关键字搜索。
<!DOCTYPE html>
<html lang="en">
    <head>
        <meta charset="UTF-8">
        <title>世上最牛逼的页面标题</title>
        <meta name="keywords" content="欧美,日韩,国产,网红,直播" />
    </head>
    <body>
        <h1>这个栗子就别运行老子了,随便去看一个网站的源代码吧。</h1>
    </body>
</html>
meta 网站描述
meta 标签可以设置网站描述信息,用于在搜索引擎搜索时,显示网站基本描述信息。
<!DOCTYPE html>
<html lang="en">
    <head>
        <meta charset="UTF-8">
        <title>野鸭子</title>
        <meta name="keywords" content="欧美,日韩,国产,网红" />
        <meta name="description" content="野鸭子是一个面向全球的皮条平台。" />
    </head>
    <body>
        <h1>这个栗子就别运行老子了,随便去看一个网站的源代码吧。</h1>
    </body>
</html>
meta 触屏缩放
meta 标签可以设置页面是否支持触屏缩放功能,其中各元素的含义如下:
width=device-width,表示宽度按照设备屏幕的宽度。initial-scale=1.0,初始显示缩放比例。minimum-scale=0.5,最小缩放比例。maximum-scale=1.0,最大缩放比例。user-scalable=yes,是否支持可缩放比例(触屏缩放)
<!DOCTYPE html>
<html lang="en">
<head>
    <meta charset="UTF-8">
    <title>标题标题标题标题</title>

    <!--支持触屏缩放-->
    <meta name="viewport" content="width=device-width, initial-scale=1, user-scalable=yes">

    <!--不支触屏持缩放-->
    <!--<meta name="viewport" content="width=device-width, initial-scale=1, maximum-scale=1, user-scalable=no">-->
</head>
<body>
    <h1 style="width: 1500px;background-color: green;">一起为爱鼓掌吧</h1>
</body>
</html>
link 图标
<!DOCTYPE html>
<html lang="en">
    <head>
        <meta charset="UTF-8">
        <title>野鸭子</title>
		<link rel="icon" href="图标文件路径">
    </head>
    <body>
        <h1>隔壁王老汉的幸福生活</h1>
    </body>
</html>
例如,将图标文件路径设置为必应的图标(按 F12,在控制台中可以找到链接地址)链接 //cn.bing.com/sa/simg/bing_p_rr_teal_min.ico,就可以将我们的网页图标替换为必应的了。
简单 head 内部标签总结
<!DOCTYPE html>
<html lang="en">
<head>
    <meta charset="UTF-8">
    <title>野鸡平台</title>
    <meta name="keywords" content="欧美,日韩,国产,网红"/>
    <meta name="description" content="野鸡是一个面向全球的皮条平台。"/>
    <meta http-equiv="X-UA-Compatible" content="IE=edge">

    <meta name="viewport" content="width=device-width, initial-scale=1, user-scalable=yes">
    <link rel="icon" href="//cn.bing.com/sa/simg/bing_p_rr_teal_min.ico">

</head>
<body>
    <h1 style="width: 1500px;background-color: green;">我们一起为爱鼓掌呀!!!</h1>
</body>
</html>
body 标签
直接在 body 中写内容
body 标签里面的没有其他标签包裹的内容,就是普通文本显示
<body>
    Hello World!
</body>
特殊符号
空格
> >
< <h1 - h6 标题
与 MarkDown 语言类似,HTML 也只支持六级标题。
<body>
    <h1>一级标题</h1>
    <h2>二级标题</h2>
    <h3>三级标题</h3>
    <h4>四级标题</h4>
    <h5>五级标题</h5>
    <h6>六级标题</h6>
</body>
br 换行
<h1>一级标题</h1>
<h2>二级<br>标题</h2>注意点:所有的回车空格等空白内容都被认为是一个空格

hr 一行横线
<h2>三级<hr>标题</h2>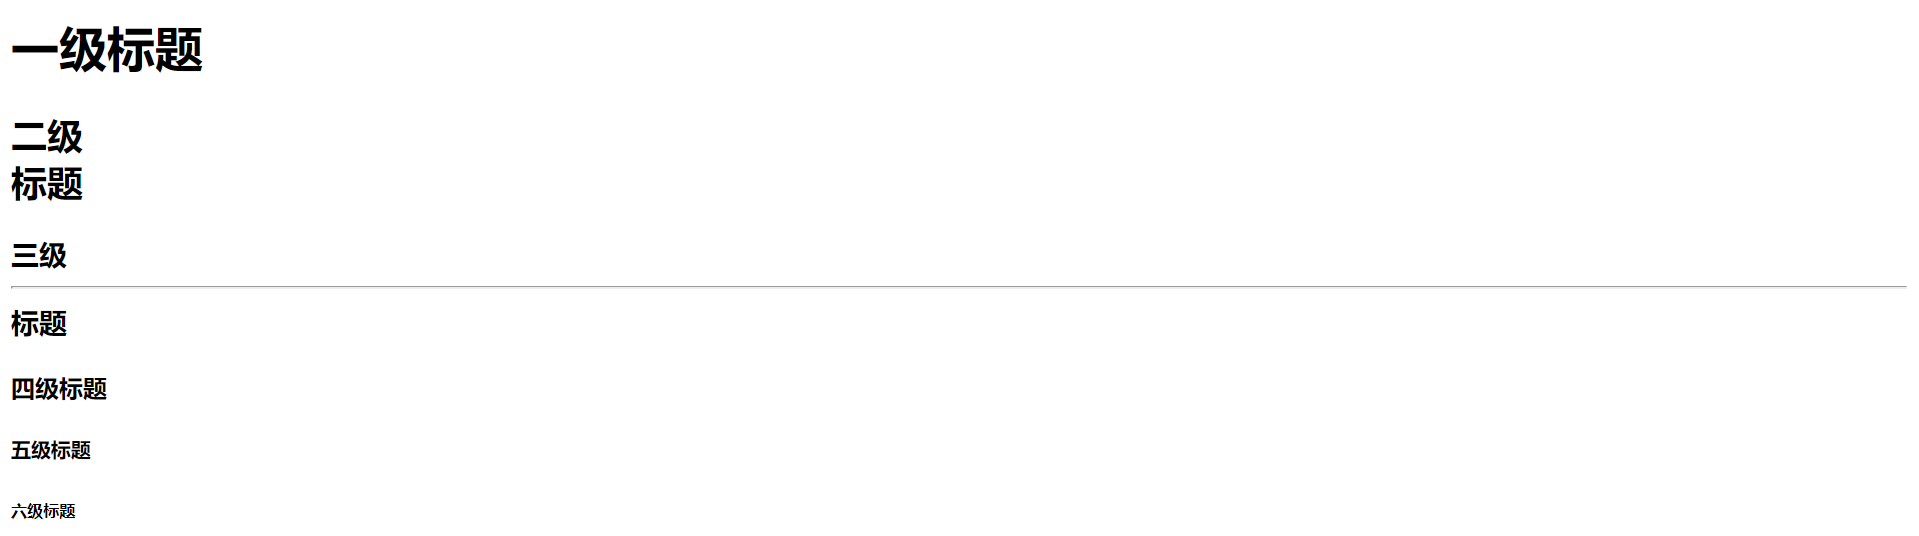
a 标签 超链接
- 不加 href 属性,就是普通文本显示
<a>python短片</a>
- 加上 href 属性,不加值,文字有颜色效果,还有下划线,并且点击后会刷新当前的 html 页面
<a href="">python短片</a>

- 加上 href 属性,并且加上值,跳转对应网址的页面
<a href="https://www.python.org" target="_self">python短片</a>
未访问之前是蓝色的字体颜色
访问之后是紫色的字体颜色
我们可以通过设置 target 属性控制是否在新窗口打开链接:
- _self:在当前标签页打开 href 属性值的那个网址
- _blank:在新的标签页打开 href 属性值的那个网址
例如,如果我们将 target 属性值设定为 _blank,就会在新窗口打开网页了。

- 锚点,页面内容进行跳转,可以跳转到页面指定位置
<!DOCTYPE html>
<html lang="en">
<head>
    <meta charset="UTF-8">
    <title>Title</title>
</head>
<body>

<div id="top">这是顶部</div>

<a href="#i1">第一章 初入贵境</a>
<a href="#i2">第二章 开局一人一条狗</a>
<a href="#i3">第三章 就是干</a>
<a href="#i4">第四章 大结局</a>


<div id="i1" style="background-color: red;">第一章 初入贵境</div>
<p>
    没干啥好事儿!!
</p>
<p>
    没干啥好事儿!!
</p>
<p>
    没干啥好事儿!!
</p>
<p>
    没干啥好事儿!!
</p>
<div id="i2" style="background-color: red;">第二章 开局一人一条狗</div>
<p>
    给狗洗澡!!
</p>
<p>
    给狗洗澡!!
</p>
<p>
    给狗洗澡!!
</p>
<p>
    给狗洗澡!!
</p>
<div id="i3" style="background-color: red;">第三章 就是干</div>
<p>
    干狗!!!
</p>
<p>
    干狗!!!
</p>
<p>
    干狗!!!
</p>
<p>
    干狗!!!
</p>
<p>
    干狗!!!
</p>
<div id="i4" style="background-color: red;">第四章 大结局</div>
<p>
    中毒身亡!!!
</p>
<p>
    中毒身亡!!!
</p>
<p>
    中毒身亡!!!
</p>
<p>
    中毒身亡!!!
</p>
<p>
    中毒身亡!!!
</p>
<p>
    中毒身亡!!!
</p>
<p>
    中毒身亡!!!
</p>
<p>
    中毒身亡!!!
</p>
<p>
    中毒身亡!!!
</p>
<p>
    中毒身亡!!!
</p>
<p>
    中毒身亡!!!
</p>
<p>
    中毒身亡!!!
</p>
<p>
    中毒身亡!!!
</p>
<p>
    中毒身亡!!!
</p>
<p>
    中毒身亡!!!
</p>
<p>
    中毒身亡!!!
</p>
<p>
    中毒身亡!!!
</p>

<a href="#top">返回顶部</a>

</body>
</html>
描述:标签设置 id 或 name 属性的值(假设为 xx),a 标签 href 属性的值写法:href='#xx'。点击这个 a 标签就能跳转到 id 或 name 属性为 xx 的那个标签所在位置。
在这个例子中,每一章的标题位置都设置了锚点,点击开头的目录,就会跳转到相应的标题。同样,也在顶部设置了锚点,当点击返回顶部的连接时,会直接跳转回顶部。

img 图片
img 标签用来向页面中插入图片,其基本格式为:
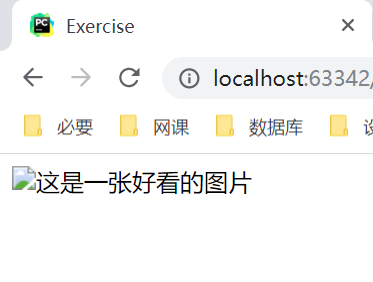
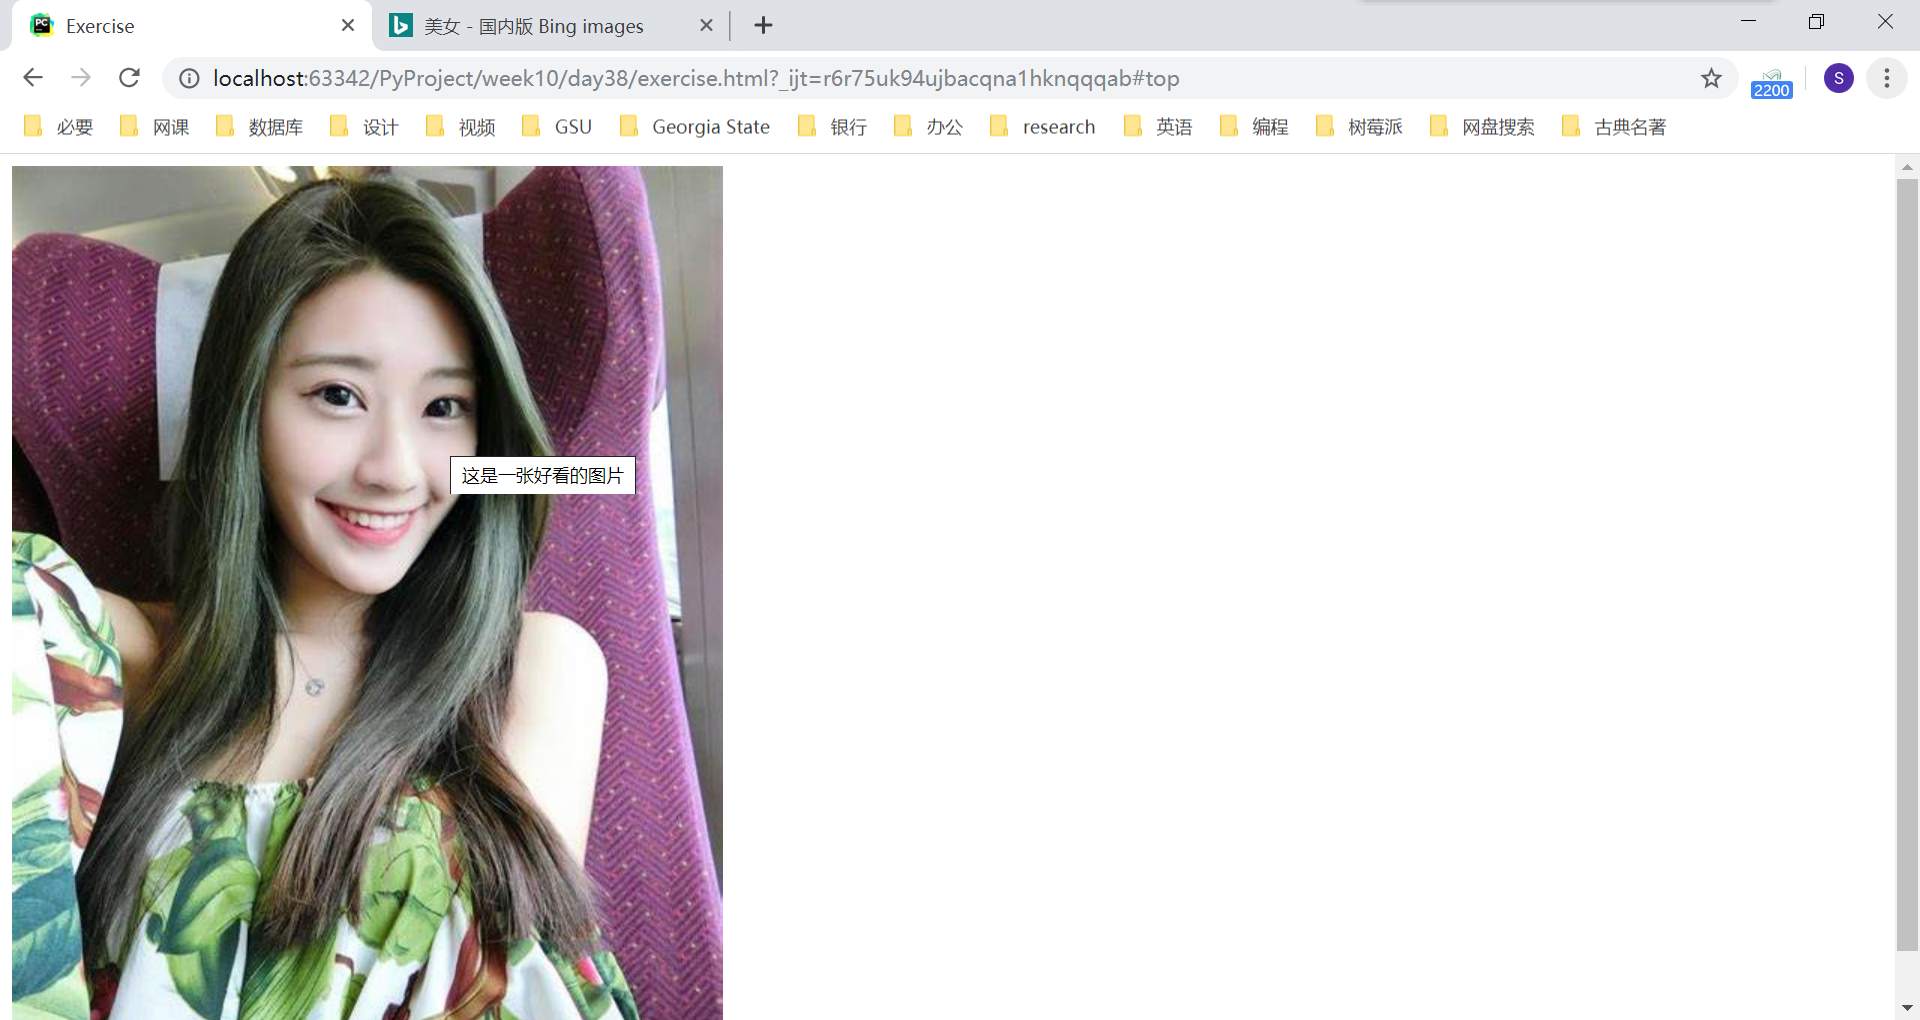
<img src="https://cn.bing.com/th?id=OIP.-2Y0C7Bopl_7V4UzZrDzegHaJQ&pid=Api&rs=1" alt="这是一张好看的图片" title="这是一张好看的图片">
<img width="200" height="200" src="timg.jpg" alt="这是一个美女图片,稍等片刻" title="子萌">
我们可以控制 img 标签中的几个属性,来调节图片的显示状态:
src 属性:图片路径,必须写啊。可以是网络路径,也可以是本地路径。
alt 属性:图片加载失败或者正在加载时提示的内容
![]()
title 属性:鼠标悬浮时显示的内容
![]()
还有两条不常用,日后我们主要会通过css来控制
- width:设置宽度
- height:设置高度
div 标签和 span 标签
这两个标签没有任何的文本修饰效果。
正因为这两个标签没有任何文本修饰效果,所以日后我们会大量使用它们。
就好比我们用一张白纸画画要比在一张已经画好的画中修改更舒服。
在新版本的 HTML 5 中又有了更多的没有样式的标签,比如 header、footer 等,若有需要可以去了解一下。
标签分类
- 块级标签(行外标签):独占一行,比如,h1-h6、p、br、hr、div、ul、li
- 块级标签能够包含内联标签,和某些块级标签,块级标签能够设置高度宽度
- 内联标签(行内标签):不独占一行,比如,img、a、span
- 只能包含内联标签,不能包含块级标签,不能自主设置高度宽度,高度宽度由内容决定
ul 和 ol 列表
<!-- 示例:-->
兴趣爱好:
<ul>
    <li>抽烟</li>
    <li>喝酒</li>
    <li>烫头</li>

</ul>

喜欢的姑娘:
<ol type="I" start="2">
    <li>韩红</li>
    <li>贾玲</li>
    <li>李宇春</li>
</ol>

<!-- dl 标签了解 -->
<dl>
    <dt>河北省</dt>
    <dd>邯郸</dd>
    <dd>石家庄</dd>
    <dt>山西省</dt>
    <dd>太原</dd>
    <dd>平遥</dd>
</dl>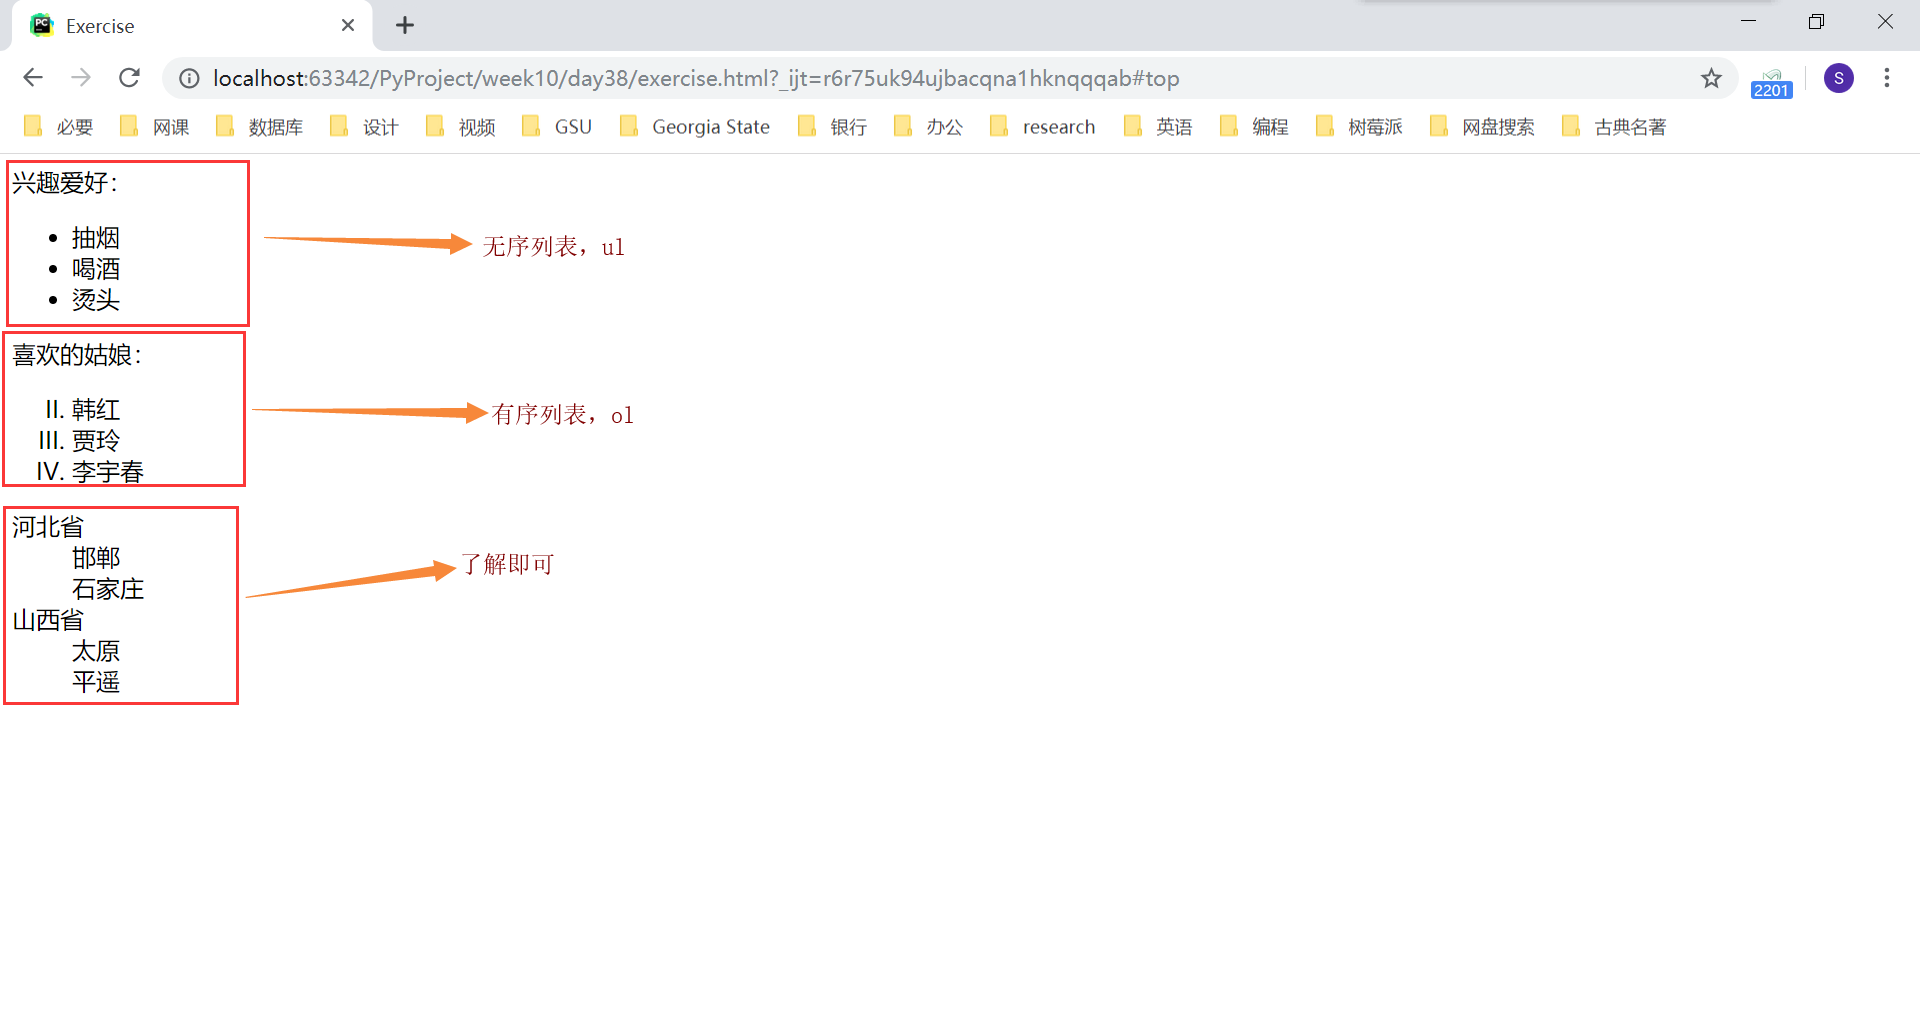
table 表格
<table border="1">
    <thead>
        <tr>
            <th>id</th>
            <th>name</th>
            <th>hobby</th>
        </tr>
    </thead>
    <tbody>
        <tr>
            <td>1</td>
            <td>李晨浩</td>
            <td>看电影</td>
        </tr>
        <tr>
            <td>2</td>
            <td>冯俊</td>
            <td>迟到</td>
        </tr>
        <tr>
            <td>3</td>
            <td>大圣</td>
            <td>玩棍儿</td>
        </tr>
    </tbody>
</table>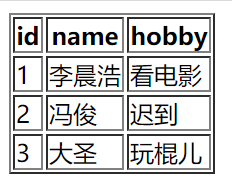
表格合并(rowspan="2":纵行合并;colspan='2':横列合并)
<table border="1">
    <thead>
        <tr>
            <th>id</th>
            <th>name</th>
            <th>hobby</th>
        </tr>
    </thead>
    <tbody>
        <tr>
            <td>1</td>
            <td>李晨浩</td>
            <td rowspan="2">看电影</td>
            <!--<td>看电影</td>-->
        </tr>
        <tr>
            <td>2</td>
            <td>冯俊</td>
            <!--<td>迟到</td>-->
        </tr>
        <tr>
            <td>3</td>
            <td colspan="2">大圣</td>
            <!--<td>玩棍儿</td>-->
        </tr>
    </tbody>
</table>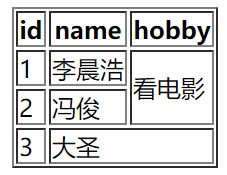
form 表单
用来提交表单中的数据
<form action="http://127.0.0.1:8001" method="post" novalidate autocomplete="off">
</form>- action 属性:指定提交路径,要把数据提交到哪里去。
- method 属性:提交的方法,可以是 post 或 get
- novalidate 属性:不要浏览器对数据进行校验
- autocomplete 属性:根据历史输入的内容,提示用户输入,on 开启,off 关闭
form 表单标签会将嵌套在 form 标签里面的输入框的数据全部提交到指定路径。
input 输入框
input 标签,如果要提交数据,别忘了写 name 属性 例如:name='username' username='zhangjianzhi',name 属性将作为键传给后端,用来标记值。
<input type="text">   普通文本输入框
<input type="password"> 密文输入框
<input type="submit" value="登录">  提交按钮  触发form表单提交数据的动作
<input type="reset"> 重置按钮 清空输入的内容
<input type="button" value="注册"> 普通按钮  不会触发form表单提交数据的动作
<input type="date">  时间日期输入框
<input type="file">  文件选择框
<input type="number">  纯数字输入框

单选框
    性别
    <input type="radio" name="sex" value="1">男
    <input type="radio" name="sex" value="2">女
复选框(多选框)
    喜欢的明星:
    <input type="checkbox" name="hobby" value="1"> 波多
    <input type="checkbox" name="hobby" value="2"> 小泽
    <input type="checkbox" name="hobby" value="3"> 仓井
我们使用下面的代码进行测试:
<form action="http://127.0.0.1:8001">
    请输入用户名:<input type="text" name="username">
    请输入密码:<input type="password" name="password">
    <input type="submit" value="提交">
    <input type="reset">
</form>
顺利在 socket 端接收到我们输入的用户名和密码信息。
label 标签
给输入框加上标签,这样当用户点击标签内容的时候,输入框就会自动获取光标。
<label >用户名:
    <input type="text" name="username" id="username">
</label>
<label for="password">密码: </label>
<input type="password" name="password" id="password">
button 按钮
普通按钮,没有提交效果
<input type="button">
<button type="button">注册</button>

下面两个能够提交form表单数据。如果不写,button默认为submit
<input type="submit" value='登录'>
<button type="submit">注册</button>
select 下拉框
<!--单选下拉框-->
<select name="city" id="city">
    <option value="1">北京</option>
    <option value="2">上海</option>
    <option value="3">深圳</option>
    <option value="4">惠州</option>

</select>
<!--多选下拉框-->
<select name="citys" id="citys" multiple>
    <option value="1">北京</option>
    <option value="2">上海</option>
    <option value="3">深圳</option>
    <option value="4">惠州</option>
</select>
操作多选下拉框,需要按住 ctrl 键进行多选。

textarea 多行文本输入框
<textarea name="comment" id="comment" cols="20" rows="10"></textarea>