Nginx 快速入门
Nginx 简介
Nginx 概述
Nginx 是一个使用 C 语言开发的高性能的 HTTP 服务器和反向代理服务器以及电子邮件(IMAP/POP3)代理服务器。
Nginx 是俄罗斯的程序设计师 Igor Sysoev 为俄罗斯访问量第二的 Rambler.ru 站点开发的。
Nginx 的优点
轻量级
在应对高并发情况时,能保持低资源低消耗高性能
高度模块化的设计,配置简洁
官方测试 Nginx 能够支撑 5 万并发量,并且 CPU、内存等资源消耗却非常低,运行非常稳定。
Nginx 的应用场景
HTTP 服务器。Nginx 可以独立提供 HTTP 服务,可以做网页静态服务器
虚拟主机。可以实现在一台服务器虚拟出多个网站
反向代理,负载均衡
Nginx 版本下载
官网下载地址:http://nginx.org/en/download.html

Nginx 的安装
安装准备
首先要安装一些依赖:
yum -y install gcc-c++ pcre pcre-devel zlib zlib-devel openssl openssl-develNginx 的安装
将下载好的安装包传到 CentOS 的 /usr/local 目录下。
解压压缩包:
tar -zxvf nginx-1.10.3.tar.gz进入解压好的 Nginx 安装目录中:
cd nginx-1.10.3创建临时文件存放的文件夹:
mkdir -p /var/temp/nginx/完整复制下面这段,执行 configure,生成 Makefile:
./configure \
--prefix=/usr/local/nginx \
--pid-path=/var/run/nginx/nginx.pid \
--lock-path=/var/lock/nginx.lock \
--error-log-path=/var/log/nginx/error.log \
--http-log-path=/var/log/nginx/access.log \
--with-http_gzip_static_module \
--http-client-body-temp-path=/var/temp/nginx/client \
--http-proxy-temp-path=/var/temp/nginx/proxy \
--http-fastcgi-temp-path=/var/temp/nginx/fastcgi \
--http-uwsgi-temp-path=/var/temp/nginx/uwsgi \
--http-scgi-temp-path=/var/temp/nginx/scgi
编译:
make安装:
make install安装完成后,在 /usr/local 目录下会出现一个 nginx 文件夹,里面有一个 sbin 目录,存放着 nginx 的启动文件。

创建 Nginx 的软链接:
ln -s /usr/local/nginx/sbin/nginx /usr/local/bin/nginx测试验证配置有没有问题:
[root@node01 sbin]# nginx -t
nginx: the configuration file /usr/local/nginx/conf/nginx.conf syntax is ok
nginx: configuration file /usr/local/nginx/conf/nginx.conf test is successful
如果之前没有创建临时文件的文件夹可能会报错。若出现少文件夹的报错,自己创建一下

Nginx 的启动
首先检查防火墙,是关闭的状态:

启动 Nginx,查看进程:
[root@node01 sbin]# nginx
[root@node01 sbin]# ps aux | grep nginx
root       7499  0.0  0.0  25016   772 ?        Ss   23:10   0:00 nginx: master process nginx
nobody     7500  0.0  0.1  25436  1224 ?        S    23:10   0:00 nginx: worker process
root       7502  0.0  0.0 112732   960 pts/0    R+   23:10   0:00 grep --color=auto nginx
[root@node01 sbin]# netstat -tunlp | grep 7499
tcp        0      0 0.0.0.0:80              0.0.0.0:*               LISTEN      7499/nginx: master
直接输入 nginx 就是启动 Nginx。我们看到,出现了两个进程。一个是 master,也就是主进程,还有一个 worker,也就是工人进程。Nginx 监听的是 80 端口。
浏览器访问 CentOS 的 IP 地址,即可

Nginx 的停止
关闭 Nginx 并查看进程:
[root@node01 sbin]# nginx -s stop
[root@node01 sbin]# ps aux | grep nginx
root       7532  0.0  0.0 112732   960 pts/0    R+   23:16   0:00 grep --color=auto nginx
Nginx 刷新配置
启动后,若修改配置,如下刷新即可,不需要重启 Nginx:
[root@node01 sbin]# nginx -s reloadNginx 详解
Nginx 安装目录

conf:nginx 的配置文件
html:nginx 默认访问的根目录,存放静态资源
sbin:存放 nginx 运行脚本
Nginx 配置文件


worker_processes:工作进程:数目。根据硬件调整,通常等于 CPU 数量或者 2 倍于 CPU。
worker_connections:每个工作进程的最大连接数量。根据硬件调整,和前面工作进程配合起来用,尽量大,但是别把 CPU 跑到 100% 就行。
include:设置支持的文件类型,具体内容在
mime.types中sendfile:sendfile 指令指定 nginx 是否调用 sendfile 函数(zero copy 方式)来输出文件,对于普通应用,必须设为 on。如果用来进行下载等应用磁盘 IO 重负载应用,可设置为 off,以平衡磁盘与网络 IO 处理速度,降低系统 uptime。
keepalive_timeout:keepalive 超时时间。
server:一个 server 就是一个虚拟机
listen:server 虚拟机的端口号
server_name:server 虚拟机的主机名
location:默认访问的资源
root html:虚拟主机的根目录
Nginx 的基本使用
Web 站点
如下目录,存的东西,外部可直接访问

多虚拟主机
多虚拟主机的好处是省钱,省事。我们可以使用一台主机,部署多个不同的项目。这真的是一个特别神奇的功能。可以实现使用不同的域名,定位到同一个 IP 的同一台主机,然后得到不同的项目页面。
直接修改配置:
[root@node01 conf]# pwd
/usr/local/nginx/conf
[root@node01 conf]# vi nginx.conf
在原 server 下,再加一个 server。有两点需要注意,首先千万要注意括号要成对写,不要漏掉,然后每行语句后面都要加上分号:
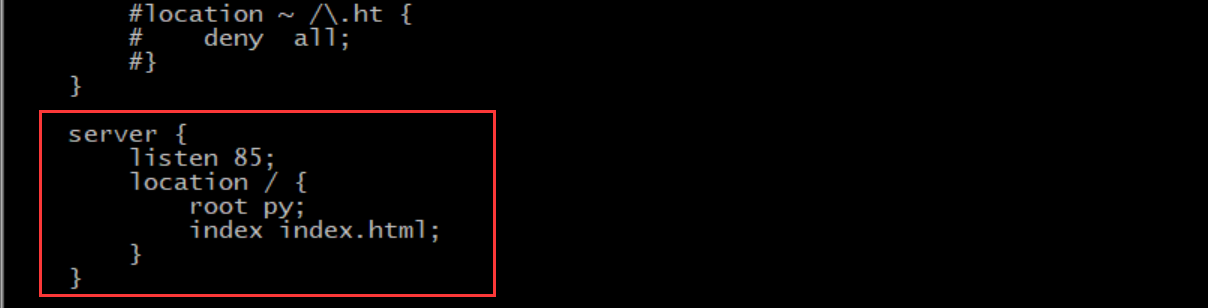
修改完成后,保存并退出。
把 html 文件夹复制一份,叫 py,跟刚刚我们配置的对应上:
[root@node01 nginx]# pwd
/usr/local/nginx
[root@node01 nginx]# ll
总用量 4
drwxr-xr-x 2 root root 4096 4月  27 23:30 conf
drwxr-xr-x 2 root root   38 4月  27 23:04 html
drwxr-xr-x 2 root root   18 4月  27 23:04 sbin
[root@node01 nginx]# cp -r html py
[root@node01 nginx]# ll
总用量 4
drwxr-xr-x 2 root root 4096 4月  27 23:30 conf
drwxr-xr-x 2 root root   38 4月  27 23:04 html
drwxr-xr-x 2 root root   38 4月  27 23:31 py
drwxr-xr-x 2 root root   18 4月  27 23:04 sbin
修改 index.html,让自己能区分:
[root@node01 py]# pwd
/usr/local/nginx/py
[root@node01 py]# vi index.html
刷新配置:
[root@node01 py]# nginx -t
nginx: the configuration file /usr/local/nginx/conf/nginx.conf syntax is ok
nginx: configuration file /usr/local/nginx/conf/nginx.conf test is successful
[root@node01 py]# nginx -s reload
这时,访问 80 端口还是原来的 Nginx 页面,但是访问 85 端口就成了我们刚刚配置的页面:

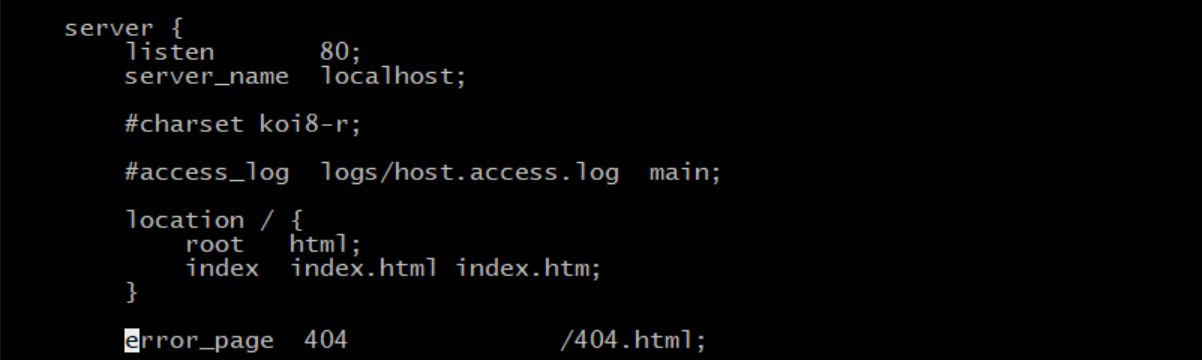
404 页面设置
Nginx 有默认的 404 页面,但是不是很好看,而且会直接把 Nginx 的版本暴露出来,有一定的安全隐患:

配置里,可以把如下注释打开,自己创建错误页面
创建一个对应的 404.html:
[root@node01 html]# pwd
/usr/local/nginx/html
[root@node01 html]# echo "very sorry" > 404.html
刷新 Nginx 配置:
[root@node01 html]# nginx -t
nginx: the configuration file /usr/local/nginx/conf/nginx.conf syntax is ok
nginx: configuration file /usr/local/nginx/conf/nginx.conf test is successful
[root@node01 html]# nginx -s reload
再次访问错误页面,就会出现我们自己指定的 404 页面了:

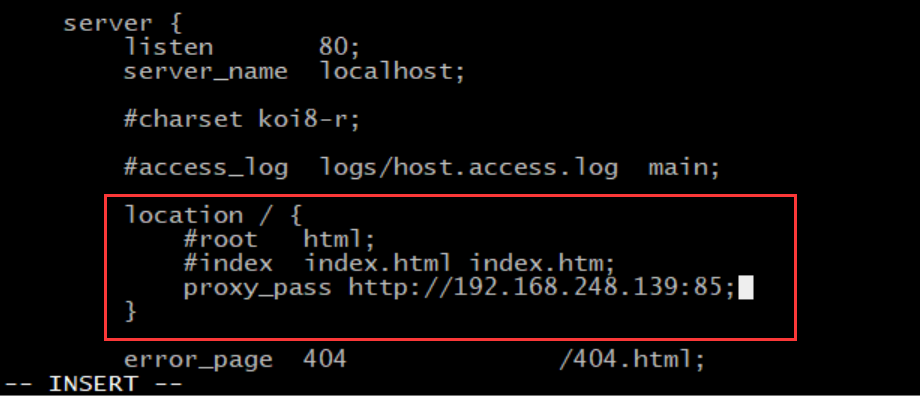
Nginx 反向代理
正向代理,代理的是客户端;反向代理,代理的是服务端。
修改 Nginx 配置文件如下,此时,访问 80 端口,实际上会转发到 85 端口:
刷新配置:
[root@node01 conf]# nginx -t
nginx: the configuration file /usr/local/nginx/conf/nginx.conf syntax is ok
nginx: configuration file /usr/local/nginx/conf/nginx.conf test is successful
[root@node01 conf]# nginx -s reload
访问 80,跳转到了 85:

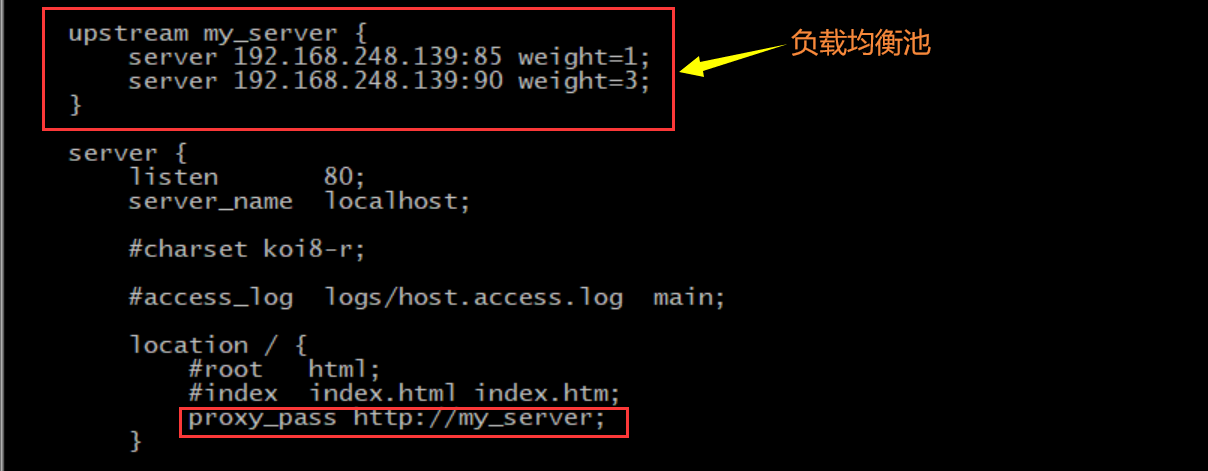
Nginx 负载均衡
Nginx 的负载均衡其实就是高级版的反向代理,将请求分别代理到多个服务器中,即实现了负载均衡。
修改配置文件,添加负载均衡池,80 端口反向代理到负载均衡池:
在下面还要多创建一个 90 端口的 server:
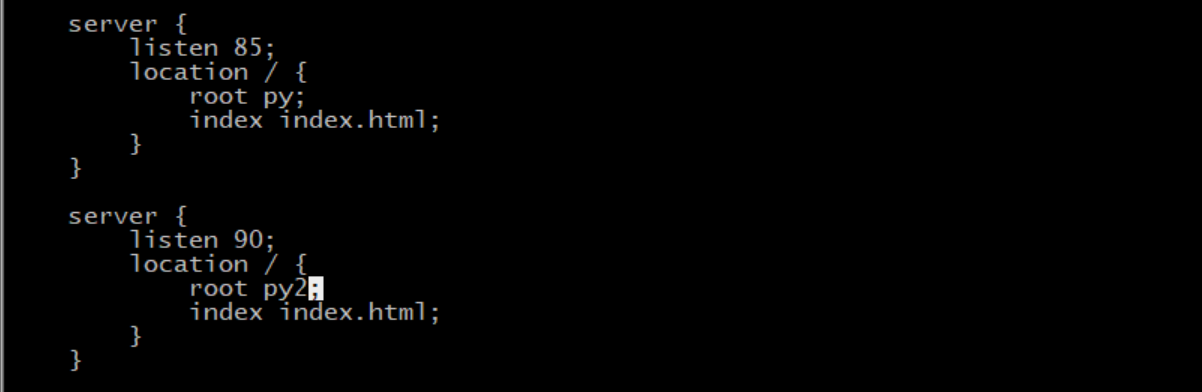
复制 py,创建个 py2,修改里面的 index.html,有区分就行:
[root@node01 nginx]# pwd
/usr/local/nginx
[root@node01 nginx]# cp -r py py2
[root@node01 nginx]# cd py2
[root@node01 py2]# vi index.html
刷新配置:
[root@node01 py2]# nginx -t
nginx: the configuration file /usr/local/nginx/conf/nginx.conf syntax is ok
nginx: configuration file /usr/local/nginx/conf/nginx.conf test is successful
[root@node01 py2]# nginx -s reload
页面访问,此时实现了反向代理到 85 和 90,也是按照权重去访问的:
